Showing posts with label apples. Show all posts

Tuesday, March 11, 2008

Again and again and again...

I usually go for variety when it comes to food. I mean, sure, I have favourites, comfort food, and a dishes that I turn to when otherwise uninspired. Every cook needs some sort of standard repertoire. But I feel somehow dissatisfied if a week's gone by and I haven't tried something new. I am definitely a creature of habit and of routine... but that routine must include something new.

The dish that I want to tell you about today defies everything I just said about variation. I could eat it for days on end, and usually do. It's something my mom made when Matt and I were back in Albuquerque over Christmas break. I ate it almost obsessively while we were there, and started recreating it the moment we got home. I've been meaning to photograph it and write down some sort of recipe or guideline ever since, but I "forgot" every time... which meant, of course, that I had the perfect excuse to make it all over.

Perhaps a week ago, I finally got my act together, took notes in the kitchen, and found my camera before we sat down to eat. These are the results:


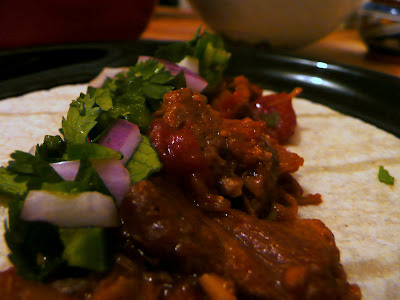
Braised Pork with Fruit and Jalapeno-Lime Salsa
adapted from my parents

The amounts for this are very approximate (I don't think I've made it the same way twice). Play around with the quantities and see how you like it best.

2 - 2 1/2 lbs pork, cut into 3-inch-ish chunks
4 large-ish cloves garlic, chopped (somewhere around the 3 tablespoon mark?)
1 medium-sized yellow onion, diced
1/2 large apple, cored, peeled and chopped
1 orange, with peel, sliced into rounds (discard the end slices)
14 oz. can diced tomatoes with juice
1 chipotle chile from a can, finely chopped
1/2 - 3/4 cup chicken broth
canola oil
salt and freshly ground pepper to taste

Preheat oven to 375 degrees.

Over medium-high heat, in a large dutch oven, heat a layer of oil. Add as much of the pork as will fit easily in a single layer on the bottom of the pan and brown on all sides. Repeat with remaining pork. Set aside, then add onion to the pan and saute until translucent and soft. Add garlic and saute until fragrant, but not brown. Add about 1/4 cup of the chicken broth to deglaze pan, then remove from heat. Reintroduce pork and any juices that have collected. Add apple, orange, tomatoes, chipotle, and as much chicken broth as needed to come about halfway up the pork mixture. Add salt and freshly ground pepper, but be gentle at this point - you can always add more later.

Cover, and bake in oven for at least three hours - four is better - or until the apple, tomato and orange pulp have melted together, and the pork is very tender. Stir every 30 minutes or so. After the first two hours, you may want to remove the oranges to separate the pulp and the zest, discarding the zest and adding the pulp back to the mixture. Alternatively, let it cook for long enough and the zest will melt into the dish as a whole. After three hours or so, take the pork out and shred it, then put it back into the oven. Taste, and adjust for salt. By the time it's done, it should practically melt in your mouth, and most of the liquid should have been absorbed - it shouldn't be at all soupy. If it is, let it cook for longer.

Serve with Jalapeno-Lime Salsa (recipe follows) and warm corn tortillas.
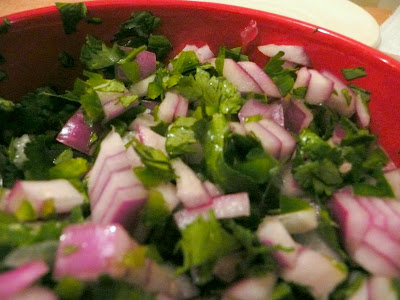


Jalapeno-Lime Salsa

1/2 red onion, diced
2 jalapenos (or serranos), de-seeded (optional - depends on how spicy you like it - too spicy and the pork will be overwhelmed) and finely chopped
large handful cilantro, chopped
juice of 2 limes
salt

Combine red onion, jalapenos, cilantro and lime juice in a bowl. Taste and adjust for salt.


The salsa will survive for a couple of days in the fridge - it's best fresh. The pork, however, does very well as leftovers - and will last you until you buy the ingredients to start all over again.

Monday, January 7, 2008

Worth the extra work

Well, Portland has certainly welcomed us back in what I understand is true Northwest style: rain everyday since we returned on New Year's Day. We saw the sun for the first time since our vacation today. Not to sound ungrateful - it's lovely to be back. I missed our cats and our tiny, overheated apartment and the low, grey skies - the light in New Mexico is so terribly bright, so very clear. I've gotten used to the mellower richness of colours here, and gotten used to the greenery. I expect trees, now, and am no longer surprised by them. Albuquerque was so much flatter, and so much browner than I remembered it being.

That said, we sure managed to eat well while Matt and I were in town.

We had a host of places to visit, and even managed to fit in an extra visit to our beloved old
Frontier Restaurant (and reminisce about snow days and post-concert late night sweet rolls and breakfast burritos).

But I'm not here to rub green chile in anyone's face. I'm here to talk about some of the food we managed to turn out in my parents' kitchen: specifically New Year's Eve Dinner, here rather dramatically lit:


I'm afraid that the vast majority of our photos turned out this way - I could never be bothered to turn on any lights in the dining room to take proper shots. Now I'm paying for it.

The menu was largely from the
Zuni Cafe Cookbook (a most welcome Christmas present - Judy Rodgers is my new hero), with a dessert inspired by a recipe of Alice Medrich's. Remember those chocolate cookies awhile back? Same creator.

But dinner was as follows:
Mock Porchetta (or Tuscan Roast Pork) with roasted vegetables (fennel, onion, celeriac, parsnip, whathaveyou)
Savoury Apple Charlotte
Cream Puffs with Chocolate Grand Marnier Custard and Candied Violets

Altogether, the meal was three days in the making, and it was so utterly worth it. The pork and vegetables were lovely - delightful, in fact - an excellent roast. But the real scene-stealers were the Apple Charlotte and the Cream Puffs, which was in some ways quite gratifying, as they were, respectively, the most difficult and the easiest components. (Frustrating because now I know I'm going to have to make that Charlotte at least once a year, and god is it a nightmare. Such a tasty nightmare though, and so pretty on the plate.)

It begins, as many things do here at Itadakimasu, with apples.


Specifically, four pounds of braeburn apples, that my mother and I peeled, cored and sliced, draped with slivers of butter and roasted until they were tender and caramelized, and the mashed into a rough apple sauce.


The next day, we cut out templates from pieces of paper, sliced bread into half-width slices and a multitude of shapes to create bread linings in 6-ounce ramekins. Think a jigsaw puzzle, with crumbly cracked-wheat and walnut breads. I was tearing my hair by the end of it.


We then filled them with the apple sauce, buttered them further, and baked them until they were crisp and golden on the outside.


And then we ate them, which was probably a bad idea - because the combination of the crisp, buttery bread and the warm, sweet-but-not-too-sweet applesauce made the entire process seem very worthwhile, and entirely doable.

If you have the time and inclination to try this, you will not be disappointed. Honestly, these could go with a much simpler meat - they somewhat overshadowed the roast. More honestly, I would eat them on their own and be a very happy camper.

Roasted Applesauce & Savoury Apple Charlotte
from The Zuni Cafe Cookbook, by Judy Rodgers

For about 3 cups of applesauce:

3 1/2 - 4 pounds apples (use eating apples - Braeburns were fine, I would have preferred Pippins, because they're one of my favourites, but we were working with what we could find)
Pinch of salt
Up to 2 teaspoons sugar, as needed (I didn't use any - the apples were quite sweet on their own)
About 2 tablespoons unsalted butter
A splash of cider vinegar (highly recommended!)

Preheat the oven to 375 degrees.

Peel, core and quarter the apples. Toss with a little salt and, unless they are very sweet, a bit of sugar to taste. Spread in a shallow baking dish that crowds the apples in a single layer. Drape with slivers of butter, cover tightly and bake until the apples start to soften, 15 to 30 minutes.

Uncover, raise the heat to 500 degrees, and return the pan to the oven. Leave the apples to dry out and colour slighly, about 10 minutes. (A confession - we neglected to raise the temperature, so our apples got a much longer, slower roast - and were lovely, nonetheless. They were in the oven for nearer an hour, if I remember correctly.)

When the tips of the apples have become golden and the fruit is tender, scrape them into a bowl and stir into a chunky mash. Season with salt and sugar to taste, then consider a splash of apple cider vinegar to brighten the taste. (Yes!)

For the Charlotte, 4 servings:

4 six-ounce ramekins or custard cups

A chunk of day-old, chewy, peasant-style bread (make sure you have plenty of extra to get the right shapes!)
About 2-3 tablespoons unsalted butter, melted (err on the side of 3-4 tablespoons)
About 1 1/3 cups Roasted Applesauce (again, err on the side of more)

Preheat the oven to 350 degrees.

Slice the bread 1/8 inch thick. Avoiding the crust, cut 8 circles sized to fit the bottom of your ramekins, then cut 4 long rectangles to line the sides.(Judy Rodgers suggested partially freezing it, and I second this! Also, don't worry if you can't get whole pieces to create the shell of the charlotte - they piece together quite nicely.)

Brush the bread evenly, on one side only, with the melted butter. Line the ramekins with the bread, pressing the buttered  faces against the dishes. Set the 4 extra circles aside. Fill each ramekin with the roasted applesauce. Set the remaining bread circles, buttered side up, on top and press down lightly.

Bake until golden brown on top, about 30 minutes. To serve, slide a knife around the edge of each charlotte, then turn out onto warm plates. If the bottom circles stick to the dish, retrieve them by sliding a fork under the edges. (This wasn't an issue at all - yay for butter!)

Eat, and savour, knowing that you probably won't have these again for quite awhile, because you have to forget all about the paper templates and the partially-frozen bread before you could possibly convince yourself to go through it all again.

And don't worry, I won't make you wait too long for those cream puffs.

Sunday, November 11, 2007

One more thing to do with apples

I swear I've been trying to post for the last week. First real life ate me, and then blogger ate my post twice in one night, and I decided that was probably a sign that I should go study or something like that. Anyway.


I made this Apple Kuchen shortly after my last post, when we still had apples and were wondering what to do with them. And then I took the name to work and got one of my co-workers to teach me how to pronounce it.


The recipe itself I found on Baking Bites, a blog I have frequented ever since I discovered it via the ReadyMade blog. It was then called Bakingsheet, and the post that caught my eye was a recipe for homemade graham crackers, which were then supposed to be incorporated into homemade s'mores. I was still in my occasional-batch-of-cookies-and-brownies stage of cooking, so needless to say I never got around to either the crackers or the s'mores... but I still read the blog.


Origins aside, this is a nice, not-terribly-sweet cake that goes excellently with tea. I plan to omit the apples in an upcoming version and try it as a loaf cake - I'll let you know how it goes.

And a gratuitous kitty pictures never hurts - it's been too long.


Chuck has this thing for being cute in boxes - I can't help myself.

Monday, October 29, 2007

How d'you like them apples?


We liked them just fine. Liked them for two days and a whole galette, no less.


When we got home from the farmer's market, I had a bag full of apples and a mind full of pie... and then realized that I didn't really want to spend the entire afternoon peeling and coring and slicing. So I went with the slacker's version of apple pie: an apple galette, which combines beautifully flaky pie crust with a generous layer of apples, cinnamon and sugar. And it requires only one and a half good-sized apples, which means you can spend more time enjoying that rare clear blue sky and less time with your paring knife.

It is also the perfect excuse to get out your brand new pastry blender - which you bought specifically for this project. (Some good must come of working in a kitchenwares store).


Apple Galette
adapted from the Joy of Cooking

For the pastry:
1 1/4 cups all-purpose flour
1/2 teaspoon sugar
1/2 teaspoon salt
10 tablespoons (1 stick plus 2 tablespoons) cold unsalted butter, cut into 1/4 inch pieces
2-3 tablespoons ice water

For the fruit:
~1 1/2 large apples of your choice (I used pippin)
3 tablespoons unsalted butter, melted and then cooled to lukewarm
3 tablespoons sugar
~1/4 teaspoon cinnamon (I don't actually know how much I used - I have a heavy hand with cinnamon)

In a large mixing bowl, combine your flour, 1/2 teaspoon sugar and 1/2 teaspoon salt. Using a pastry blender, chop the butter into the flour mixture until it resembles breadcrumbs, with a few larger pea-sized pieces. Work quickly, so that the butter doesn't melt. Drizzle 2 tablespoons ice water over the flour mixture. At this point, I start using my hands to bring the dough together. If it's too dry, add another tablespoon of water, but be careful not to let it get too wet. Form the dough into a ball, flatten it into a thick disc, then wrap it in plastic wrap and put it in the refrigerator for about 30 minutes.

Preheat the oven to 425 degrees.

Use this time to prep the apples. Peel and core 2 apples, then slice them about 1/8 inch thick.


Take the dough out of the refrigerator, and, on a sheet of parchment paper, roll it into about an 11-inch round. Brush a thin layer of melted butter over the dough.

Leaving a 1-inch rim of dough bare, layer the apples in slightly overlapping concentric circles on the pastry.


Fold the border of the dough over the edge of the apples. Galette are supposed to be rustic and charming, so don't worry if it looks a little messy. Drizzle all but about 2 teaspoons of the remaining butter over the apples. In a little bowl, combine the 3 tablespoons sugar and as much cinnamon as looks good (1/4 teaspoon is a good starting point), and sprinkle over the apples.


Bake at 425 degrees for about 15 minutes, or until the pastry starts to colour. Then lower the temperatures to 350 degrees and bake for approximately another 25 minutes, until the pastry is golden brown and sounds hollow when you try to tap it and end up burning your fingers.

Pull the pan out of the oven, brush the apples with the last of the butter and let cool. Once it has cooled, transfer it to a plate (good luck with this - it's a bit tricky, since the pastry is so very crumbly). Your best bet is probably to transfer the galette with the parchment paper, and then slide the paper from underneath.


Serve with milk or tea - you'll need something, that's for sure.


And while it's best that first day, it will keep overnight if covered, and make a very tasty breakfast the next morning.


Sunday, October 14, 2007

Not-so-lazy-weekends

Matt and I haven't really had time for one of our lazy Sunday mornings, recently. I work full time, so my "weekend" is comprised of the two days I go to class, and Matt goes to school full time, so his "weekend" is comprised of the two days he spends at work. But the last time we had a day off together, I made us a breakfast (probably sometime around two pm) of what I now call French Toast with Amaretto Apples.


The basic idea behind it is your preferred French Toast with a variation of carmalized apples with brandy - not having any brandy on hand, I used amaretto, and it worked to my advantage. I'm afraid I don't have a terribly specific recipe for this. As Matt can tell you, cooking with me can be an occasionally frustrating experience, as I don't usually measure things unless I'm either cooking from a new recipe for the first time, or baking. I cook the way my parents do. How much do I add? Enough - the right amount. Until it tastes/looks/smells/feels right. So, the following is an appoximation of how I make my French Toast.

Serves twoish - may vary according to appetite.

For the toast:
2 thick slices of whatever leftover bread you have around (I used sourdough boule from a couple days previous, a whole wheat pain would be lovely - walnut bread, if that's your thing)
2 eggs
2 large splashes milk
1 capful vanilla extract (about 1/2 a teaspoon, maybe?)
a few generous shakes of ground cinnamon (anywhere from 1/4 to 1/2 tsp - I like cinnamon)
butter for the pan

In a large baking dish or shallow bowl (I use a 9x13x2 inch Pyrex), whisk the eggs with the milk, vanilla and cinnamon, and then add the bread and let sit, turning occasionally, until most of the egg mixture has been soaked up. In a cast iron pan over medium-high heat, melt enough butter to coat the bottom of the pan. When the butter is just sizzling, add the bread. You want it to start cooking on contact, so that it forms a nice crust. Let it fry without disturbing it until a nice goldeny brown crust forms, and then flip it and let the other side develop that same kind of crust and the bread cooks through.

When the bread is done, cover to keep warm.

For the apples:
1 large apple of your choice - something that cooks/bakes well. I used a Honeycrisp for this recipe - I love Honeycrisp. I would steer clear of Golden Delicious - they tend to go mushy. The amount of apple is negotiable - use more if you're an apple fan. I only had one apple left, otherwise I might have used two.
2 capfuls amaretto (3 tablespoonsish)
a sprinkling of sugar
a few more generous shakes of cinnamon
butter for the pan

Note: you should have the apples ready to go into the pan before you start the toast. If you have the kind of stove that can handle it (i.e. more than one large burner) you can start the apples after you flip the toast to its second side.

Core the apple, and then slice thinly. It should look like this when you're done:


Try not to eat too much of it before it goes into the pan.

Again, melt enough butter to generously coat the bottom of a cast iron pan over medium-high heat. Saute the apples until they are warm and wilting, then sprinkle with sugar to taste (depending on how sweet you like your fruit - keep in mind that the amaretto will sweeten it further), cinnamon to taste, and then add a couple of capfuls of amaretto. (Like I said, for me a couple of capfuls is approximately 3 tablespoons. Again, this is very however-much-you-want-at-the-time).

Turn the heat down if the apples are getting too soft, and let the amaretto reduce slightly, until it gets a little syrupy.


Put a slice of French Toast on each plate, and top with apples.


Good luck with your version.

Oh, and gratuitous kitty photo, because they were being cute while I was cooking: