Monday, March 17, 2008

Recreating Japan

My friend Katie is heading for Japan in the next couple of months, and while I've warned her that I'm going to be sending a shopping list along with her, I'm having a hard time deciding what to put on it.

The problem I'm having is that most of what I want from Japan isn't the type of thing that you can put in a suitcase and carry around with you - it's less tangible than that. What I want is the feeling of being there, of walking down the streets, taking unexpected turns into tiny alleys and finding a half-forgotten shrine next to a Tokyo department store or pachinko parlor; the long, winding, steep cobbled roads up to the waterfall at Kiyomizu Dera in Kyoto; the late-night train rides home, watching reflections in the opposite window of the half-empty car; learning to doze standing upright in the morning rush hour crush of passengers and not missing your stop. I want the festivals - I want the language - I want the unmarked streets and semi-incomprehensible signs - the frustration of not being able to read completely, the satisfaction when I recognize the occasional kanji.

I also miss the food, but luckily that's something I can usually recreate at home - like okonomiyaki.


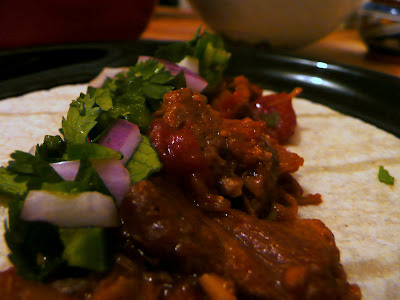
Okonomiyaki is usually described as a "Japanese stuffed pancake," which isn't right at all. That said, I don't really know what is right. It is pancake shaped, yes, and fried on a griddle or in a pan. There is a batter, made with dashi or water, flour, yama-imo (mountain yam) and egg, then mixed with shredded cabbage, green onion, benishoga (pickled ginger), and the meat/seafood of your choice. In some districts they add noodles - but that's not the style in Nagoya, where I used to live. And then there is the sauce - sort of a Japanese barbecue sauce - and Japanese mayonnaise (totally different than American mayonnaise). Suffice to say, it sounds odd, looks a little odd, and tastes fantastic. And except for the benishoga and Japanese mayonnaise (which you should be able to find at your nearest asian/Japanese grocery), everything is pretty easy to come by.

Okonomiyaki
adapted from Hiroko Shimbo

for the sauce:
1/2 cup tomato ketchup
3 tablespoons Worcestershire sauce
1/2 teaspoon smooth French-style mustard
1/4 cup mirin
2 tablespoons sugar
2 teaspoons shoyu (soy sauce)

for okonomiyaki:
1 cup flour
1 cup water or dashi
1/2 teaspoon salt
3 tablespoons grated yama-imo (you can use potato starch in a pinch, or skip it altogether in an even pinchier pinch)
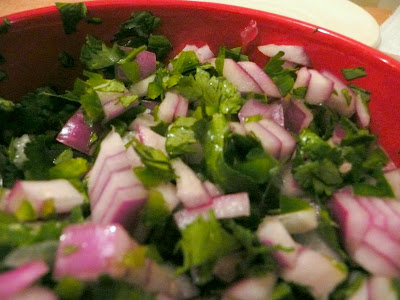
4 ounces green cabbage, shredded
1/4 cup green onions, sliced into rounds (I use the white and the lighter green parts)
2 tablespoons minced benishoga (note - this is red pickled ginger, not the kind you get with sushi!)
4 ounces beef sirloin, cut into thin strips
6-8 large-ish shrimp, shelled, deveined and sliced in half lengthwise
2 eggs
vegetable or canola oil

To make the sauce:

In a small saucepan, combine all ingredients. Bring to a boil and cook over low heat for 3 minutes. Remove from heat and set aside. Serve warm, or at room temperature (I prefer mine warmish).

To make the okonomiyaki:

First off, here is a dashi recipe. You can definitely skip the dashi and just use water, but if you have the time/energy, I definitely recommend dashi.

Sift flour into a bowl, add the dashi (or water), salt and grated yama-imo (or potato starch), and stir to mix. Divide the batter between two bowls, and put half of the cabbage, green onions, benishoga, beef and shrimp into each bowl. Add one egg to each bowl, and mix to combine.

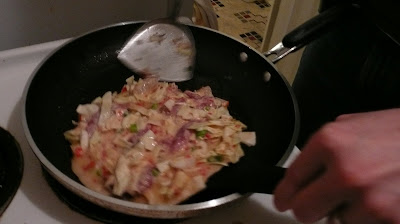
Over medium-high heat, in a large skillet or on a griddle, heat enough vegetable oil to coat the bottom of the pan. When it is hot, pour the batter from one bowl into the skillet and spread the batter into a disk about 8 inches in diameter. Leave yourself a little room on either side to fit spatulas in later. Lower heat to medium and cook until the bottom is golden.

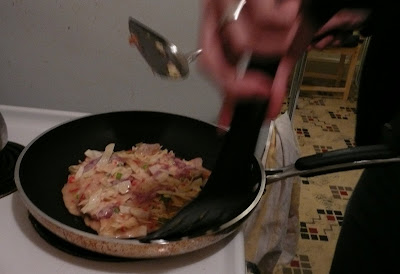
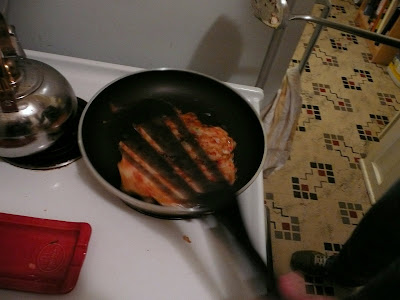
Then comes flipping, the most difficult part of okonomiyaki. You have a fairly loose, large pancake-like object in the pan, about eight inches across and perhaps three-quarters of an inch thick. To flip it, you'll need two spatulas, wrist strength, and nerves of steel: as such, Matt is the official okonomiyaki-flipper in our house.

First goes one spatula.

Then a second spatula.

Take a deep breath, lift, and commit - that's the key. You can't be afraid of the okonomiyaki during the flipping, or it will fall apart on you. (I've found the same is true of flipping fried eggs - the yolk always knows I'm scared, and it takes advantage of that and breaks.)


If it falls apart terribly, scoot the pieces back together and soldier on - it'll still taste good. Cook until the other side is golden and the middle is set (ish).


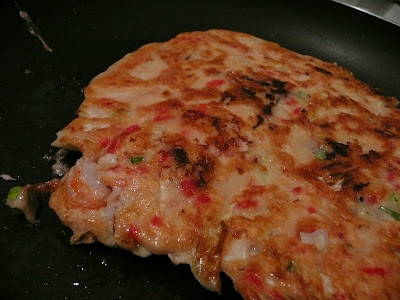
Divide into quarters and plate, topping with plenty of sauce and mayonnaise. (We didn't have the right kind of mayonnaise, so we just ate it with the sauce - also very okay!)

If necessary, heat a little more oil in the pan before adding the second bowl of batter - let this one cook while you eat the first one. They make decent leftovers, too, if you're full after round one.

Oh, and start saving for your next trip to Japan.

Tuesday, March 11, 2008

Again and again and again...

I usually go for variety when it comes to food. I mean, sure, I have favourites, comfort food, and a dishes that I turn to when otherwise uninspired. Every cook needs some sort of standard repertoire. But I feel somehow dissatisfied if a week's gone by and I haven't tried something new. I am definitely a creature of habit and of routine... but that routine must include something new.

The dish that I want to tell you about today defies everything I just said about variation. I could eat it for days on end, and usually do. It's something my mom made when Matt and I were back in Albuquerque over Christmas break. I ate it almost obsessively while we were there, and started recreating it the moment we got home. I've been meaning to photograph it and write down some sort of recipe or guideline ever since, but I "forgot" every time... which meant, of course, that I had the perfect excuse to make it all over.

Perhaps a week ago, I finally got my act together, took notes in the kitchen, and found my camera before we sat down to eat. These are the results:


Braised Pork with Fruit and Jalapeno-Lime Salsa
adapted from my parents

The amounts for this are very approximate (I don't think I've made it the same way twice). Play around with the quantities and see how you like it best.

2 - 2 1/2 lbs pork, cut into 3-inch-ish chunks
4 large-ish cloves garlic, chopped (somewhere around the 3 tablespoon mark?)
1 medium-sized yellow onion, diced
1/2 large apple, cored, peeled and chopped
1 orange, with peel, sliced into rounds (discard the end slices)
14 oz. can diced tomatoes with juice
1 chipotle chile from a can, finely chopped
1/2 - 3/4 cup chicken broth
canola oil
salt and freshly ground pepper to taste

Preheat oven to 375 degrees.

Over medium-high heat, in a large dutch oven, heat a layer of oil. Add as much of the pork as will fit easily in a single layer on the bottom of the pan and brown on all sides. Repeat with remaining pork. Set aside, then add onion to the pan and saute until translucent and soft. Add garlic and saute until fragrant, but not brown. Add about 1/4 cup of the chicken broth to deglaze pan, then remove from heat. Reintroduce pork and any juices that have collected. Add apple, orange, tomatoes, chipotle, and as much chicken broth as needed to come about halfway up the pork mixture. Add salt and freshly ground pepper, but be gentle at this point - you can always add more later.

Cover, and bake in oven for at least three hours - four is better - or until the apple, tomato and orange pulp have melted together, and the pork is very tender. Stir every 30 minutes or so. After the first two hours, you may want to remove the oranges to separate the pulp and the zest, discarding the zest and adding the pulp back to the mixture. Alternatively, let it cook for long enough and the zest will melt into the dish as a whole. After three hours or so, take the pork out and shred it, then put it back into the oven. Taste, and adjust for salt. By the time it's done, it should practically melt in your mouth, and most of the liquid should have been absorbed - it shouldn't be at all soupy. If it is, let it cook for longer.

Serve with Jalapeno-Lime Salsa (recipe follows) and warm corn tortillas.


Jalapeno-Lime Salsa

1/2 red onion, diced
2 jalapenos (or serranos), de-seeded (optional - depends on how spicy you like it - too spicy and the pork will be overwhelmed) and finely chopped
large handful cilantro, chopped
juice of 2 limes
salt

Combine red onion, jalapenos, cilantro and lime juice in a bowl. Taste and adjust for salt.


The salsa will survive for a couple of days in the fridge - it's best fresh. The pork, however, does very well as leftovers - and will last you until you buy the ingredients to start all over again.

Tuesday, March 4, 2008

On a well-caffeinated note...

Matt has joined the blogging realm and started Dark Coffee, a coffee blog. He'll be writing about his experience as a barista and sharing some of what he's learning about espresso.

Most enticingly, perhaps, he'll be posting weekly latte art photos - go take a look.

Monday, March 3, 2008

A temperamental beast

I'm jonesing for summertime.

Yes, I profess to love rain, and yes, fall is my favourite season, and yes, I did whine all last summer that it was too hot, that it was too humid, that I couldn't wait for it to be over. But now I'm sorry, really I am, and all I can think about is tomato season, and berry season, and the farmer's market, and oh god sunshine. We got a little taste of spring this past week or so - it was beautiful and sunny and I carried my camera everywhere with me and never took any photos - at least not of the great outdoors.

I took photos of cake, though.


If ever my family had a cake recipe, it's this one: Orange Chiffon Cake with Lemon Glaze. My mom taught me how to make it, and my dad rhapsodizes about his mother buying them from the bakery truck when he was a child. It makes for a good transitional recipe, too: flavoured with citrus, which is readily available in the winter, but somehow summery tasting. The cake recipe itself is from the Joy of Cooking, though the glaze varies from season to season and lemon to lemon. And I don't know how chiffon cakes got such a reputation as terrifying and temperamental beasts - be nice to your egg whites and you'll get along fine. (Of course, I can be as smug as I like about that down here at sea level - in New Mexico it was a slightly different story).


Orange Chiffon Cake with Lemon Glaze
from the Joy of Cooking

For the cake:

Preheat the oven to 325 degrees. Have ready 1 ungreased 10-inch tube pan with a removable bottom, and make sure the ingredients are at room temperature, 68-70 degrees.

Sift together twice into a large bowl:
2 1/4 cups sifted cake flour (I used all purpose and it worked out fine)
1 1/4 cups sugar
1 tablespoon baking powder
1 teaspoon salt

In another bowl, beat on high speed until smooth:
5 large egg yolks
3/4 cup orange juice
1/2 cup vegetable oil
2 tablespoons grated orange zest
1 teaspoon vanilla

Stir into the flour mixture until smooth.

In another large bowl, beat on medium speed until soft peaks form:
8 large egg whites
1/2 teaspoon cream of tartar

Gradually add, beating on high speed:
1/4 cup sugar

Beat until peaks are stiff, but not dry. Use a rubber or silicone spatula to fold one-quarter of the egg whites into the egg yolk mixture, then fold in the remaining whites. Scrape the batter into the pan and spread evenly. Bake until the top springs back when lightly pressed and a toothpick inserted into the center comes out clean, 55 to 65 minutes. Let cool upside down for at least 1 1/2 hours, setting the tube over a bottleneck, or resting the pan on 4 glasses.

To unmold the cake, slide a thin-bladed knife around the cake to detach it from the pan, and lift out of the pan by pulling on the tube (this is why you want the removable bottom!) Then cut around the tube and the base of the cake and invert onto a plate. When you're cutting, be sure to press the blade of the knife against the pan, to avoid tearing the cake.

For the glaze (approximately):

2/3 cup lemon juice (juice of 2-3 lemons)
1/4 cup-ish powdered sugar

Stir powdered sugar to taste into lemon juice to dissolve. I like just enough to take the edge of sour off, but still keep a bit of pucker.

To glaze the cake, brush or spoon the glaze over the top of the cake, being sure to get the corners and let it run down the sides. Allow a couple of hours before serving to let it soak in a bit.